
How to Enter a WPS Pin on an HP Printer? If your printer does not have a WPS button, you will need to find it. This article will show you how to generate a WPS pin and enter it on your HP printer. You can also find the WPS button on your printer by following the steps below. We hope you find this information useful. And if you have any questions or concerns, please feel free to ask away!
How to connect to a wireless network with a WPS pin
To connect an HP printer to a wireless network, you must first turn on Wi-Fi. Open your HP printer’s Control Panel, and find the Wireless button. Select Wi-Fi Protected Setup. Follow the on-screen instructions to enter the WPS pin. A WPS pin is different from a password and can be any length. When your printer detects a network, it will show a blinking blue light.
If your HP printer has an LED screen, you will need to enter the WPS pin to secure your wireless connection. Turn on your HP printer and restart it. Press the wireless button to select the WPS pin. A wireless blue light will begin blinking. Press it again to confirm. You can use this wireless connection on other computers. Once it is set up, you can queue print jobs from anywhere.
How to generate a WPS pin
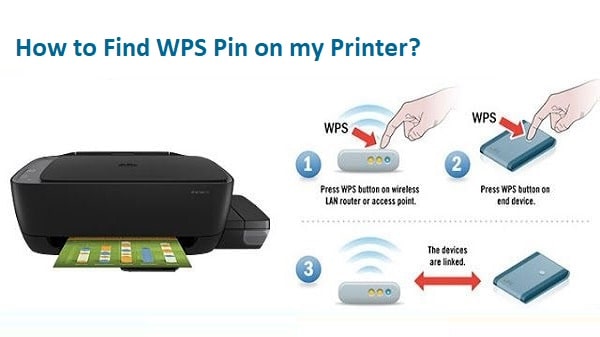
If you’re not familiar with WPS, it stands for Wi-Fi Protected Setup. The WPS pin is used to establish a wireless connection between two accessible devices. To connect an HP printer to a wireless network, you’ll need to find its WPS pin. This code is located on the back of HP printers and can be found on the device itself or in the printer’s manual.
Next, go to your HP printer and press the wireless button to enter the Wi-Fi Protected Setup. You’ll need to press the WPS button on the router, too, but you can also find it on the printer. To enter the WPS button, press the wireless button on your HP printer. Then, follow the alerts. You’ll be prompted to enter your WPS pin.
How to enter a WPS pin on an HP printer
To set up a wireless network with an HP printer, you need to know the WPS PIN. To enter the WPS pin, you can access the printer’s control panel. Open the HP folder, select the Wireless or Settings Button, and find the Wi-Fi Protected Setup option. Next, press the “Wi-Fi” button to turn on the wireless network.
After you have installed the software, go to the control panel and tap Network Setup. Next, click on the Info button and hold it for at least five seconds. The printer will print a page containing the WPS PIN. This PIN is valid for two minutes, so you must enter it within this time frame. After entering the WPS pin, your printer will automatically recognize the wireless network and send it to the router.
If you have a wireless network, you can connect your HP printer to it by pressing the WPS button located on the back of your wireless router. To connect to an HP printer, you can use this connection to connect to other devices. The WPS button will also let you connect your printer to other gadgets, such as a computer or mobile phone. When the printer is successfully connected to your computer, you can then print reports and other documents without a problem.
How to find the WPS button on an HP printer
If you are wondering how to connect your HP printer to your wireless network, you should first learn how to find the WPS button. If your printer does not have a top screen, you can find this button on the back of the printer. Pressing this button for 10 seconds or more will enable the wireless connection. Once the connection is established, you can use the WPS feature to connect your printer to your computer or other wireless devices. To use the WPS feature, you must restart the printer and place it near your computer.
If you cannot find the WPS button on your HP printer, don’t worry, you’re not alone! Many HP printers have this button hidden within their control panels. It’s very easy to get it. Just follow the instructions on the screen to complete the setup process. You’ll have to wait for two or three minutes for the lights on the printer and router to stop blinking. Once they’ve finished blinking, you can move on to step 2.